Monday, December 5, 2011

Windows Console Game: Painter's Algorithm


The previous post in this series was on a wonderful bag of tricks used to set a custom color palette (awesome!) and change the font and font size. In this post we'll be going over the painter's algorithm, and how to actually make use of it in your game.


The painter's algorithm is a very simple priority paradigm which dictates when you place what image onto the screen.


For example suppose you have three different images; the sky, a cloud, and  the sun. You want to display these images, but you don't want the sun overlapping a cloud (physically impossible), or even worse have the blue sky overlap everything. To solve this you simply draw images onto the screen starting with the one that is going to be furthest back in terms of depth, which would be the sky.


Example of drawing sky, then sun, then cloud. Correct.


Example of drawing sky, then cloud, then sun. Wrong.


If we recall the article on event handling, the article actually taught a method for producing and writing images to the screen by using header files to hold image data and a function to write images to an array (or buffer) of CHAR_INFO structures. Using the same system, you can create images in header files and then write them to the screen in the correct order so that images overlap each other at the proper times. The way you go about this is to have your array of CHAR_INFO structures for writing images to. Then once you've manipulated the array (or buffer) all you want, you then pass it to the WriteConsoleOutput function and place it onto the screen in one fell swoop.


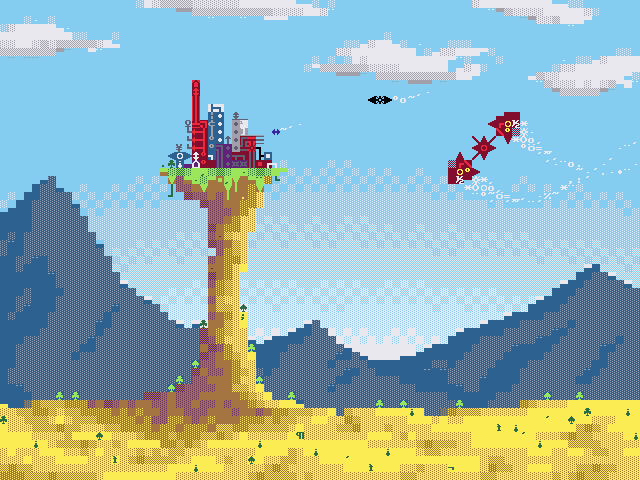
Here's a screenshot of a demo program I wrote just for this specific purpose!
Rendering of images with transparency using painter's algorithm.
Note: Read this article for info on resizing font, this will allow
you to have square characters like in the image above (8x8).


Building from our knowledge gained in the previous posts, I've put together a nice demo that displays the images above, and lets you draw on the screen with the left and right clicks of the mouse. Lets examine some of the code:


#ifndef FILESUNH
#define FILESUNH


/* A SUN background! */


#define SUNW 15
#define SUNH 15


typedef struct
{
  int width;
  int height;
  int chars[SUNW * SUNH];
  int colors[SUNW * SUNH];
} _SUN;


_SUN SUN = 
{
  SUNW,
  SUNH,
  {
    255,255,255,255,255,255,255,177,255,255,255,255,255,255,255,
    255,255,255,255,255,255,255,255,255,255,255,255,255,255,255,
    255,255,255,177,255,255,255,177,255,255,255,177,255,255,255,
    255,255,255,255,177,255,255,255,255,255,177,255,255,255,255,
    255,255,255,255,255,255,177,177,177,255,255,255,255,255,255,
    255,255,255,255,255,177,178,219,178,177,255,255,255,255,255,
    255,255,255,255,177,178,219,219,219,178,177,255,255,255,255,
    177,255,177,255,177,219, 94,219, 94,219,177,255,177,255,177,
    255,255,255,255,177,178,219,126,219,178,177,255,255,255,255,
    255,255,255,255,255,177,178,219,178,177,255,255,255,255,255,
    255,255,255,255,255,255,177,177,177,255,255,255,255,255,255,
    255,255,255,255,177,255,255,255,255,255,177,255,255,255,255,
    255,255,255,177,255,255,255,177,255,255,255,177,255,255,255,
    255,255,255,255,255,255,255,255,255,255,255,255,255,255,255,
    255,255,255,255,255,255,255,177,255,255,255,255,255,255,255,
  },
  {
      0,  0,  0,  0,  0,  0,  0, 62,  0,  0,  0,  0,  0,  0,  0,
      0,  0,  0,  0,  0,  0,  0,  0,  0,  0,  0,  0,  0,  0,  0,
      0,  0,  0, 62,  0,  0,  0, 62,  0,  0,  0, 62,  0,  0,  0,
      0,  0,  0,  0, 62,  0,  0,  0,  0,  0, 62,  0,  0,  0,  0,
      0,  0,  0,  0,  0,  0, 62, 62, 62,  0,  0,  0,  0,  0,  0,
      0,  0,  0,  0,  0, 62, 62, 14, 62, 62,  0,  0,  0,  0,  0,
      0,  0,  0,  0, 62, 62, 14, 14, 14, 62, 62,  0,  0,  0,  0,
     62,  0, 62,  0, 62, 14,224, 14,224, 14, 62,  0, 62,  0, 62,
      0,  0,  0,  0, 62, 62, 14,224, 14, 62, 62,  0,  0,  0,  0,
      0,  0,  0,  0,  0, 62, 62, 14, 62, 62,  0,  0,  0,  0,  0,
      0,  0,  0,  0,  0,  0, 62, 62, 62,  0,  0,  0,  0,  0,  0,
      0,  0,  0,  0, 62,  0,  0,  0,  0,  0, 62,  0,  0,  0,  0,
      0,  0,  0, 62,  0,  0,  0, 62,  0,  0,  0, 62,  0,  0,  0,
      0,  0,  0,  0,  0,  0,  0,  0,  0,  0,  0,  0,  0,  0,  0,
      0,  0,  0,  0,  0,  0,  0, 62,  0,  0,  0,  0,  0,  0,  0,
  }
};


#endif /* FILESUNH */

The above code is the header file for the image of the sun. As shown in this article, you can easily create new images! The most interesting thing about this image is the 255 character code in the chars array. This code is actually used for transparency. I modified our old writeImageToBuffer code to account for transparency by adding in a single if statement. If the loop finds a character of 255, it does nothing and skips the character. This will leave whatever character was already written in that particular location alone, thus creating transparency! Take a look at the new writeImageToBuffer function:


/* Writes an image to the buffer */
void writeImageToBuffer(CHAR_INFO buffer[], int chars[], int colors[], int imageBUFFERWIDTH, int imageBUFFERHEIGHT, int xoffset, int yoffset)
{
  int x, y;
  
  /* Keep xoffset and yoffset within the screen's boundaries */
  boundCheck(&xoffset, &yoffset);
  
  for (y = 0; y < imageBUFFERHEIGHT; ++y)
  {
    for (x = 0; x < imageBUFFERWIDTH; ++x)
    {
      if (chars[x + imageBUFFERWIDTH * y] != (unsigned char)255)
      {
        buffer[(x + xoffset) + BUFFERWIDTH * (y + yoffset)].Char.AsciiChar =
               chars[x + imageBUFFERWIDTH * y];
        buffer[(x + xoffset) + BUFFERWIDTH * (y + yoffset)].Attributes =
               colors[x + imageBUFFERWIDTH * y];
      }
    }
  }
  return;
}

As I said, there's simply a new if statement to make sure that the character 255 is not written onto the screen. 255 in ASCII is a character you'll more than likely find pretty useless, as it just fills the whole space with foreground, though you have the exact same thing with 219 without any nasty side affects that 255 can ensue on your code. Basically 255 is the perfect ASCII index for transparency as it's pretty much useless as anything else.


The last thing to show in this demo is the order in which you actually write images onto the buffer, being sky sun and cloud. This is really simple as shown here:


writeImageToBuffer(consoleBuffer, SKY.chars, SKY.colors, SKY.width, SKY.height, 0, 0);
writeImageToBuffer(consoleBuffer, SUN.chars, SUN.colors, SUN.width, SUN.height, 10, 5);
writeImageToBuffer(consoleBuffer, CLOUD.chars, CLOUD.colors, CLOUD.width, CLOUD.height, 15, 11);

And there you have it! By ensuring that you write images in the correct order in terms of depth, you overwrite images farther back with images closer up creating a proper sense of depth to the viewer.


The next post in this series is on a more flexible image structure format to allow a variable sized structure.


Series on creating a Windows Console game:


Thursday, December 1, 2011

Windows Console Game: Set Custom Color Palette and Font Size

Last post the topic was of event handling, this article is going to cover a treat! I have recently been graced with a great sample source code of a program that can alter the windows console font, color palette, and font size. If you've ever searched for methods of changing these aspects, if you're like me, you'd have found a whole lot of nothing. Luckily, like I mentioned, someone gave me some sample source code that I'd like to share.


The source code, as I was told and will now tell you, is filled with a whole lot of a whole lot of ugliness, undocumented Windows functions, and magic. Despite these scary facts this source code is pretty easy to use and grants access to some very nice to have features, that can make the creating of a console game much prettier! For example say you are creating an ASCII game in the Windows Console and realize that you're stuck with the default key size of 8x12 pixels. This sucks. Now constructing square images is going to be a gigantic pain! It would be wonderful if you could have all of your characters simply be squares! Well, there's a nice 8x8 Terminal font that is available to use.


Here are the source files:
I've modified the files so that they should compile cleanly in Visual Studio 2010, and in GCC 4.X.X. Once compiled the exe should run a short demo displaying a few different things, including modifying the console's color palette and setting it to the default colors, changing the font type, and changing the font size.

This all works by using a few functions from kernel32.dll, some of which are undocumented and thus very difficult to use. I don't know exactly how everything works, and a good amount of it I don't understand whatsoever - though this is to be expected when messing with things that don't have documentation. The goal is for me to explain just what is necessary to understand the idea of what's going on so you can apply these desired features to your own console application.

Lets start off by explaining the main function.


int main(void)
{
    /* Setting the color palette to the default colors
    /* Browse MSDN for COLORREF to learn more about these RGB values */
  COLORREF palette[16] = 
  {
    0x00000000, 0x00800000, 0x00008000, 0x00808000,
    0x00000080, 0x00800080, 0x00008080, 0x00c0c0c0,
    0x00808080, 0x00ff0000, 0x0000ff00, 0x00ffff00,
    0x000000ff, 0x00ff00ff, 0x0000ffff, 0x00ffffff
  };
    /* Search MSDN for the RGB macro to easily generate COLORREF values */

  SetConsolePalette(palette, 6, 6, L"");
  printf("Small default font.\n");
  Sleep(2000);
  
  SetConsolePalette(palette, 1, 2, L"Lucida Console");
  printf("Too tiny to read Lucida!\n");
  Sleep(2000);
  
  if (windowsVersionTest())
  {
    SetConsolePalette(palette, 8, 12, L"Consolas");
    printf("More of a normal Consolas size.\n");
  }
  else
  {
    SetConsolePalette(palette, 8, 12, L"Lucidas");
    printf("More of a normal Lucidas size.\n");
  }
  Sleep(2000);
  
  SetConsolePalette(palette, 43, 72, L"Lucida Console");
  printf("Huge Lucida!\n");
  
  getchar();

  return 0;
}

This function has an array of hex numbers at the top. These numbers correspond to the color palette in the Windows Console's properties:


The eight colors above correspond to the eight elements of the palette array. You can change them to any RBG value, and you can test out different values like in the screenshot above, by messing with the Red Blue and Green color value fields. Just be sure to leave the left two digits in your hex values as 0, as only the first six digits are used.


SetConsolePalette is a wrapper function that sets a console's palette, console font size, and console font. The first parameter is a color palette, the second is the font's x dimension, third is the font's y dimension, and last is the name of the font you wish to switch to in the form of a wide character literal. Available fonts are Terminal, Lucidas, and Consolas by default. In order to have more available, you have to make them! Making fonts is definitely outside of the scope of this article, however. It should be noted that Consolas is only available in Vista/7 versions of Windows, and not available in XP. If you want to use the Terminal font, on lines 109 and 139 you must set the value of the 0 to 0x30. Which line you modify depends on your OS. Just modify both of those lines if you don't know which corresponds to one you need.


That is about all the info you really need to simply use the source code! If you want to try to learn more, study the comments throughout the source code and/or ask me questions in the comments section. You can also try googling bits of the source code and see what you come up with. Googling CONSOLE_INFO came up with a lot of variations of the source I've posted, with some differing comments throughout the source files.


I haven't created my own custom font yet, though I did find a nice tool here for editing and developing raster fonts. In the near future I'll probably create my own custom font for the console game(s) I'm creating as school projects. The next article in this series is on painter's algorithm.


Series on creating a Windows Console game:

Saturday, November 26, 2011

Windows Console Game: Event Handling

The last post in this series was on writing to the console; this post I'd like to go over handling events within the Windows Console. There are two types of events we're interested in: Keyboard Events and Mouse Events. The rest of the type of events we're going to ignore (and MSDN actually advises this on a couple internally used event types). In order to read keyboard events and mouse events, we need to get a record of all events that have occurred to the console since the last time these events were retrieved. This can be done with the following console functions: GetNumberOfConsoleInputEventsReadConsoleInput.


In order to read the console's input buffer (the record of events that have happened from input, including user input), we have to know how many events there are in order to dynamically allocate memory to store those events. This is where GetNumberOfConsoleInputEvents comes. It takes the read handle and a DWORD pointer as its parameters, and places the number of events there are in the address pointed by the DWORD pointer.


/* Read console input buffer and return malloc'd INPUT_RECORD array */
DWORD getInput(INPUT_RECORD **eventBuffer)
{
  /* Variable for holding the number of current events, and a point to it */
  DWORD numEvents = 0;


  /* Variable for holding how many events were read */
  DWORD numEventsRead = 0;


  /* Put the number of console input events into numEvents */
  GetNumberOfConsoleInputEvents(rHnd, &numEvents);


  if (numEvents) /* if there's an event */
  {
    /* Allocate the correct amount of memory to store the events */
    *eventBuffer = malloc(sizeof(INPUT_RECORD) * numEvents);
    
    /* Place the stored events into the eventBuffer pointer */
    ReadConsoleInput(rHnd, *eventBuffer, numEvents, &numEventsRead);
  }


  /* Return the amount of events successfully read */
  return numEventsRead;
}


The above code is a function that places an array of INPUT_RECORD structures into the content of the pointer pointed by the parameter eventBuffer. If you're confused about the double asterisk **, then read the rest of the paragraph. If you already understand what this function is doing, skip to the next paragraph. The asterisk, known as the dereference operator, can be read as "the content pointed by". In order for this getInput function to place the INPUT_RECORD structs into the address pointed by a pointer, we have to pass a pointer to a pointer to the function -otherwise we'd only pass the value of a pointer to the function, which isn't what we want. Then, to access the the pointer we passed, we'd use one asterisk. To access the value pointed by the pointer that is pointed to by the parameter pointer, we must use a second *. See the below diagram for a visual representation. On the left, Pointer 1 is dereferenced giving you direct access to Pointer2. Pointer2 is dereferenced giving you direct access to the INPUT_RECORD. The right side of the diagram uses two dereferences to directly access INPUT_RECORD in a single stroke.


Now that we have a function for getting the INPUT_RECORD structs, we need to be able to loop through each structure and analyze what kind of record it is, and depending on what it does we can do whatever action we like.


while(1)
  {
    /* Get the input and number of events successfully obtained */
    numEventsRead = getInput(&eventBuffer);
    
    /* if more than 0 are read */
    if (numEventsRead)
    {
      /* loop through the amount of records */
      for (i = 0; i < numEventsRead; i++)
      {
        /* check each event */
        switch (eventBuffer[i].EventType)
        {
          /* if type of event is a KEY_EVENT */
          case KEY_EVENT:
            switch (eventBuffer[i].Event.KeyEvent.wVirtualKeyCode)
            {
              /* if escape key is pressed*/
              case VK_ESCAPE:
                return 0;
            }
        }
      }
    }
  }

The above code continuously loops until a user presses the escape key on their keyboard, which then makes the program close. This works by getting the INPUT_RECORD structs into the pointer eventBuffer (which points to type INPUT_RECORD) using our getInput function, and placing the return value thereof into numEventsRead. The loop then checks for a KEY_EVENT, and if found checks to see if the escape key was pressed. Similarly, you can check to see if a MOUSE_EVENT occurred in this very same way. If you understood what I've explained thus far in all of this series, you should be able to check for any keypress, with the help of the virtual keycode page, and then do something thereafter.


Now how about writing something onto the console when you click your left mouse button? The first thing you'd need is to be able to check for a MOUSE_EVENT record, and get the mouse's x and y coordinates from the MOUSE_EVENT structure. Here's an example of a case to do such a thing:


case MOUSE_EVENT:
  offsetx = eventBuffer[i].Event.MouseEvent.dwMousePosition.X;
  offsety = eventBuffer[i].Event.MouseEvent.dwMousePosition.Y;
  if (eventBuffer[i].Event.MouseEvent.dwButtonState == FROM_LEFT_1ST_BUTTON_PRESSED)
  {
    writeImageToBuffer(consoleBuffer, REDRECTANGLE.chars, REDRECTANGLE.colors, REDRECTANGLE.width, REDRECTANGLE.height, offsetx - 1, offsety - 1);
    write = YES;
  }

This indexes the INPUT_RECORD structs when a MOUSE_EVENT structure is found, and then accesses the data members X and Y, as detailed here, and places the values of the x and y position into two integers. The large constant FROM_LEFT_1ST_BUTTON_PRESSED is a Microsoft definition for a left-click. Now what is this writeImageToBuffer function? That doesn't seem to be a MSDN documented function... Well it's not! It's a simple function I wrote to write any image onto the screen buffer, given the correct parameters. The image it is writing is called REDRECTANGLE, which is actually a structure defined in a file I've written called redRectangle.h. The red rectangle is a square of 9 red characters, so to write this square onto where the user clicks, you must use offsetx - 1, and offsety -1, otherwise the top left of the red rectangle image will be placed on the left-click location, instead of the center.


Now lets check out redRectangle.h so you can see how I've set up the image of REDRECTANGLE!


/* redRectangle.h */


#ifndef FILEREDRECTANGLEH
#define FILEREDRECTANGLEH


/* A red rectangle! */


#define REDRECTANGLEW 3
#define REDRECTANGLEH 3


typedef struct
{
  int width;
  int height;
  int chars[REDRECTANGLEW * REDRECTANGLEH];
  int colors[REDRECTANGLEW * REDRECTANGLEH];
} _REDRECTANGLE;


_REDRECTANGLE REDRECTANGLE = 
{
  REDRECTANGLEW,
  REDRECTANGLEH,
  {
    219, 219, 219,
    219, 219, 219,
    219, 219, 219,
  },
  {
    4  , 4  , 4  ,
    4  , 4  , 4  ,
    4  , 4  , 4  ,
  }
};


#endif /* FILEREDRECTANGLEH */

This was the cleanest way I could think of for setting up an image that should be compatible with all versions of C. I'll start explaining from the top of the file. The two preprocessor directives ifndef and define are used to see if FILEREDRECTANGLEH is defined yet or not. If it is not yet defined, then the entire contents of the file will be included wherever an include of this file is placed. If the define FILEREDRECTANGLEH is already defined, it means that you've already included this file somewhere, and so the entire contents of the file will be skipped!


Screenshot of the final demonstration program, drawing on the window!


I have two defines for each image I write in this format, and they represent width and height as 3 in this image. These defines are critical for declaring a REDRECTANGLE, as the size needs to be defined at compile, since a template for the structure needs to be created for the program to run, and as such you need to know the size of the arrays within the REDRECTANGLE structure in order to properly place it in memory! However, the use of defines in this way makes it very simple to create other copies of images. For example, to create a new image called BLUETRIANGLE, you simply use find and replace (ctrl + h for a lot of programs) and replace all instances of REDRECTANGLE, with BLUERECTANGLE. You then would modify the color and character arrays to contain the correct data, and change the WIDTH/HEIGHT values for the defines accordingly. The structure called _REDRECTANGLE is typedef'd allowing declaration of variables by skipping writing the annoying legacy struct keyword. An instance of _REDRECTANGLE called REDRECTANGLE is then declared and initialized with the arrays containing the values for the ASCII characters, and color values.


Using this format in conjunction with the writeImageToBuffer function, you can pretty easily create new images and write them with limited amounts of code! Now lets check out a finished product: link (I didn't want to post the entire unwieldy thing here).


The last thing to mention is that if you update the screen with WriteConsoleOutputA every loop, you'll probably see little flickers as the screen is updated. This is simply a limitation of the function WriteConsoleOutputA. There are a few solutions to this. The easiest solution I've come up with is to just update screen less often, and I chose to do this by limiting the time in which the screen is updated to only when the consoleBuffer is changed. Another solution is to keep track of which portions of the screen you actually need to update, and call WriteConsoleOutputA and only write with the smallest portion of the screen as possible. Also supposedly if you update the screen with the same characters and colors multiple times it increases the chance of flickering lines, so this means you should try to avoid doing so. Lastly, you can multi-thread your program, and place just the call to WriteConsoleOutput within the additional thread. I do the first solution with a simple if statement:


  /* If write is 1, meaning the screen needs to be updated */
  if (write)
  {
    /* Write our character buffer (a single character currently) to the console buffer */
    WriteConsoleOutputA(wHnd, consoleBuffer, characterBufferSize, characterPosition, &consoleWriteArea);
    write = NO;
  }

This will only call the WriteConsoleOutputA function when write is not 0.


The entire final program demonstrates drawing a square image on the screen on left-click, and a red dot to the screen on right click. There is boundary checking on the click coordinates to prevent indexing outside of the screen!


You might by now have realized that the characters you're writing to the screen are oddly shaped rectangles. What about nice square characters? Square characters are essential for creating a nice game :( Well the next post in this series covers setting the console's font, font size, and even the color palette!


Series on creating a Windows Console game:

Wednesday, November 16, 2011

Windows Console Game: Writing to the Console

Previously I showed you all how to set up a console window! Now lets talk about writing to the Windows console. One can use printf, or fprintf, but those options aren't really exactly ideal; you don't have a desired amount of control. We're going to use the function WriteConsoleOutput in order to write a buffer of characters (array of characters) onto the console's screen buffer. The screen buffer is the inside of your game's window in which characters are written to and appear. In order to use the WriteConsoleOutput function, you have to pass to it a buffer of characters, which is really just an array of characters. The character buffer will be comprised of an array of CHAR_INFO structures, which is a Microsoft defined type that comes from windows.h. Lets get started with just writing a single character to the screen.

In C characters are enclosed letters or numbers enclosed in single quotes, like so: 'c'. Characters in c, like 'c', are treated very similarly to integers. The main difference is that the range of a character (unsigned) is from 0 to 255, where a range of integers reaches much much higher. Due to this a character variable will be one byte in memory (8 bits). You can actually write in your code 'c', and it will be treated as the value of whatever the ascii value of C is, which is 99 in decimal. You can even write c - 8, and it will be treated as 99 - 8. Here is my favorite chart for all the values of all the ascii characters available, note the indices are in hexidecimal:


The CHAR_INFO structure contains two data members; a character and its attributes. The character can either be a unicode or ascii character. We're going to stick with ascii characters within the Char.AsciiChar data member (remember, this is just an integer with a range of 0-255). The Attributes data member is a WORD type, which is just a Microsoft defined type. The WORD type is simply a 16-bit unsigned integer with a range of 0 through 65535. The Attributes data member can be viewed simply as a byte of data with the following value representations as colors:
  • FOREGROUND_BLUE - 0x0001
  • FOREGROUND_GREEN - 0x0002
  • FOREGROUND_RED - 0x0004
  • FOREGROUND_INTENSITY - 0x0008
  • BACKGROUND_BLUE - 0x0010
  • BACKGROUND_GREEN - 0x0020
  • BACKGROUND_RED - 0x0040
  • BACKGROUND_INTENSITY - 0x0080
These values are the different colors accessible for use within the Windows console. The values are represented in hexadecimal, and should be viewed as a byte:


 In the picture above I've shown a single byte, which is 8 bits of information. Each bit can be either a 1 or a 0. The first bit is on the right (at least for this representation). If you wish for your Attributes data member to contain the value blue, then you set the first bit of this byte to 1. The second bit represents whether or not you want to add green to your color, and so on and so forth. The above image would contain the values of blue, red, and intensity. This value would be in decimal format 1 + 4 + 8, which is 13. Intensity brightens the color to be displayed. Knowing this will allow us to construct whatever color we like with some simple addition! For the first color lets mix blue, green, and intensity for a value of 11.

Here is what MSDN says for the WriteConsoleOutput function in regards to parameters required:

BOOL WINAPI WriteConsoleOutput(
  __in     HANDLE hConsoleOutput,
  __in     const CHAR_INFO *lpBuffer,
  __in     COORD dwBufferSize,
  __in     COORD dwBufferCoord,
  __inout  PSMALL_RECT lpWriteRegion
);

hConsoleOutput is simply the output handle for our window, *lpBuffer is a pointer to a buffer of CHAR_INFO structures, dwBufferSize is the size of the buffer in character elements, dwBufferCoord is the location on your console screen buffer in which to write the image, and lpWriteRegion is just a pointer to a COORD structure for dictating which portion of the console to write to. Here's some code using this knowledge to write a character to the screen:

#include <windows.h> /* for HANDLE type, and console functions */
#include <stdio.h> /* standard input/output */

HANDLE wHnd; /* write (output) handle */
HANDLE rHnd; /* read (input handle */

int main(void)
{
  /* Window size coordinates, be sure to start index at zero! */
  SMALL_RECT windowSize = {0, 0, 69, 34};

  /* A COORD struct for specificying the console's screen buffer dimensions */
  COORD bufferSize = {70, 35};
  
  /* Setting up different variables for passing to WriteConsoleOutput */
  COORD characterBufferSize = {1, 1};
  COORD characterPosition = {0, 0};
  SMALL_RECT consoleWriteArea = {0, 0, 0, 0}; 
  
  /* A CHAR_INFO structure containing data about a single character */
  CHAR_INFO characterQ;
  characterQ.Char.AsciiChar = 'Q'; /* Setting the Char.Ascii data member of characterQ to the value of 'Q' */
  
  /* Setting up the color values for our Q character: blue + green + intensity */
  characterQ.Attributes = FOREGROUND_BLUE | FOREGROUND_GREEN |
                          FOREGROUND_INTENSITY;
 
  /* initialize handles */
  wHnd = GetStdHandle(STD_OUTPUT_HANDLE);
  rHnd = GetStdHandle(STD_INPUT_HANDLE);
 
  /* Set the console's title */
  SetConsoleTitle("Our shiny new title!");
 
  /* Set the window size */
  SetConsoleWindowInfo(wHnd, TRUE, &windowSize);

  /* Set the screen's buffer size */
  SetConsoleScreenBufferSize(wHnd, bufferSize);
  
  /* Write our character buffer (a single character currently) to the console buffer */
  WriteConsoleOutputA(wHnd, &characterQ, characterBufferSize, characterPosition, &consoleWriteArea);
 
  getchar();
}
The code above prints the character Q to the screen in a bright cyan color. This probably seems like a lot of work to write a single character to the screen, and it sort of is. But in actuality this isn't really how you want to write every character onto the screen. The WriteConsoleOutput function is a very slow function, and so you want to call it as little as possible. You may have heard of a term called "double buffer", well we're going to use a double buffer to do all of our modifying of a buffer off-screen, and once all our modifications are finished we can write a single image to the screen all in one go. To create this buffer, simply create an array of CHAR_INFO structures and initialize all of the Char.AsciiChar and Attribute data members! Here's an example of looping through an array of CHAR_INFOs and assigning random colors to a single Char type.
#include <windows.h> /* for HANDLE type, and console functions */
#include <stdio.h> /* standard input/output */
#include <stdlib.h> /* included for rand */

#define WIDTH 70
#define HEIGHT 35

HANDLE wHnd; /* write (output) handle */
HANDLE rHnd; /* read (input handle */

int main(void)
{
  int x, y;
  
  srand(time(0));
  
  /* Window size coordinates, be sure to start index at zero! */
  SMALL_RECT windowSize = {0, 0, WIDTH - 1, HEIGHT - 1};

  /* A COORD struct for specificying the console's screen buffer dimensions */
  COORD bufferSize = {WIDTH, HEIGHT};
  
  /* Setting up different variables for passing to WriteConsoleOutput */
  COORD characterBufferSize = {WIDTH, HEIGHT};
  COORD characterPosition = {0, 0};
  SMALL_RECT consoleWriteArea = {0, 0, WIDTH - 1, HEIGHT - 1};
  
  /* A CHAR_INFO structure containing data about a single character */
  CHAR_INFO consoleBuffer[WIDTH * HEIGHT];
 
  /* initialize handles */
  wHnd = GetStdHandle(STD_OUTPUT_HANDLE);
  rHnd = GetStdHandle(STD_INPUT_HANDLE);
 
  /* Set the console's title */
  SetConsoleTitle("Our shiny new title!");
 
  /* Set the window size */
  SetConsoleWindowInfo(wHnd, TRUE, &windowSize);

  /* Set the screen's buffer size */
  SetConsoleScreenBufferSize(wHnd, bufferSize);
  
  for (y = 0; y < HEIGHT; ++y)
  {
    for (x = 0; x < WIDTH; ++x)
    {
      consoleBuffer[x + WIDTH * y].Char.AsciiChar = (unsigned char)219;
      consoleBuffer[x + WIDTH * y].Attributes = rand() % 256;
    }
  }
  
  /* Write our character buffer (a single character currently) to the console buffer */
  WriteConsoleOutputA(wHnd, consoleBuffer, characterBufferSize, characterPosition, &consoleWriteArea);
 
  getchar();
}
The above code is creating a buffer called consoleBuffer, of a single dimensional array with the number of elements equal to WIDTH times HEIGHT, both of which are now defined at the top of the file. There is a loop that loops through all of the CHAR_INFO's Char.AsciiChar data member, and Attributes data members initializing them. You can see how I'm assigning a random value using rand, and seeding the table at the beginning of the code with srand.

You might be a little confused by the x + WIDTH * y portion of the code. I've created a single dimensional array of elements WIDTH * HEIGHT, and in order to index the array during a loop as if it were a two dimensional array, you need to use a formula. The idea behind the formula is to figure out what row you want to access, by taking the number of elements in a row and multiplying it by a value. To access the first row, you multiply the WIDTH value by 0. To access the fifth row, you'd multiply WIDTH by five. This works since as the single dimensional array is written to the screen with WriteConsoleOutput, it wraps around the screen buffer once ever WIDTH elements. Then, access a specific element within that row you add in your x value.


And there you have it! A method for writing an image onto the screen of any given size on any location of the console's screen buffer! The next post in this series will be on Event Handling.


List of all posts completed thus far:
Source(s):
http://benryves.com/
http://msdn.microsoft.com/en-us/library/windows/desktop/ms682073(v=vs.85).aspx

Windows Console Game: Setting up the Window

Have you ever seen cool looking games made with purely ASCII graphics? For example the image on the right is an amazing mock-up of an idea for a game that seems to revolve around creating some sort of city on a platform to defend from air-based attackers. I've done a bit of research, and have actually begun a project of creating an entire game from scratch by using the Windows Console as the platform. This is a great way for newer programmers to jump into game development for the following reasons:
  • Easy construction of graphics. All the graphics are just ASCII characters with varying colors!
  • Very little overhead required to get a project up and running. The Windows Console is a very simple platform to get started on.
  • All the documentation you would ever need can be found on MSDN and abroad.
  • The Windows Console is packaged with every version of the Windows OS that is popular today, so no extra anything is needed to be downloaded or installed in order to get coding.


This post is the first in a series that will show you some techniques that will allow you to create a game within the Windows Console. MSDN Documentation at this link contains all the info of all the documented functions available to manipulate the windows console programmatically. Most info in this post will be an explanation of the MSDN documentation with example code on how to use it. On the left is a screenshot from a game I'm developing called TerraNisi, which revolves around a walking tree character that has a goal of saving his Forest from spreading fire ghouls!

The first thing you need to do is set up handles for your window. The handles of a window are what the Windows OS use to identify and manipulate a window. A handle datatype looks like this: HANDLE. This type is defined within windows.h with a typedef, and thus you can declare variables of the HANDLE type once you include windows.h to your project. Once we set them up we have access to manipulate our own window! Observe the following code that simply sets up handles, and calls getchar in order to pause the program once opened so you can see the window:

#include <windows.h> /* for HANDLE type, and console functions */
#include <stdio.h> /* standard input/output */

HANDLE wHnd; /* write (output) handle */
HANDLE rHnd; /* read (input handle */

int main(void)
{
  /* initialize handles */
  wHnd = GetStdHandle(STD_OUTPUT_HANDLE);
  rHnd = GetStdHandle(STD_INPUT_HANDLE);
  getchar();
}

This code doesn't do much but set up and initialize some handles for our window. Lets set the text title for the window, as this is the simplest thing I know how to do with console functions:

#include <windows.h> /* for HANDLE type, and console functions */
#include <stdio.h> /* standard input/output */

HANDLE wHnd; /* write (output) handle */
HANDLE rHnd; /* read (input handle */

int main(void)
{
  /* initialize handles */
  wHnd = GetStdHandle(STD_OUTPUT_HANDLE);
  rHnd = GetStdHandle(STD_INPUT_HANDLE);
 
  SetConsoleTitle("Our shiny new title!");
 
  getchar();
}

Now the title of your window should say "Our shiny new title!". Congrats! You've used another console function called SetConsoleTitle! Moving on to something a little more difficult, lets try using SetConsoleWindowInfo.
  • This function takes three parameters: the first is the output handle the screen's buffer
  • The second is a boolean - if this parameter is TRUE the coordinates specify the new upper-left and lower-right corners of the window. If it is FALSE, the coordinates are relative to the current window-corner coordinates. TRUE and FALSE are defined within windows.h as 1 and 0, and if you don't understand the previous sentence I suggest just leaving this parameter as TRUE.
  • The third parameter is a SMALL_RECT structure containing the size of the new window. This parameter will set the window's edges to a size smaller than the screen's buffer. This means you cannot make it larger than the default buffer size of 80x300 (width x height) until you change the buffer size, which I'll cover momentarily.
Observe:

#include <windows.h> /* for HANDLE type, and console functions */
#include <stdio.h> /* standard input/output */

HANDLE wHnd; /* write (output) handle */
HANDLE rHnd; /* read (input handle */

int main(void)
{
  /* Window size coordinates, be sure to start index at zero! */
  SMALL_RECT windowSize = {0, 0, 69, 34};
 
  /* initialize handles */
  wHnd = GetStdHandle(STD_OUTPUT_HANDLE);
  rHnd = GetStdHandle(STD_INPUT_HANDLE);
 
  /* Set the console's title */
  SetConsoleTitle("Our shiny new title!");
 
  /* Set the window size */
  SetConsoleWindowInfo(wHnd, TRUE, &windowSize);
 
  getchar();
}

I chose to set the window size to 70 by 35, which is a decent size for some sort of game. Now you have successfully changed your window size! However you should immediately notice an ugly scroll bar on the right side of your console, and at the bottom of the console. This scroll bar is there because the console's screen buffer (the inside of the window) is larger than the window. To remedy this simply change the size of the screen buffer to that of your window coordinates with the SetConsoleScreenBufferSize function. This function has only two parameters: the output handle and COORD struct for the buffer size. Observe:

#include <windows.h> /* for HANDLE type, and console functions */
#include <stdio.h> /* standard input/output */

HANDLE wHnd; /* write (output) handle */
HANDLE rHnd; /* read (input handle */

int main(void)
{
  /* Window size coordinates, be sure to start index at zero! */
  SMALL_RECT windowSize = {0, 0, 69, 34};

  /* A COORD struct for specificying the console's screen buffer dimensions */
  COORD bufferSize = {70, 35};

  /* initialize handles */
  wHnd = GetStdHandle(STD_OUTPUT_HANDLE);
  rHnd = GetStdHandle(STD_INPUT_HANDLE);

  /* Set the console's title */
  SetConsoleTitle("Our shiny new title!");

  /* Set the window size */
  SetConsoleWindowInfo(wHnd, TRUE, &windowSize);

  /* Set the screen's buffer size */
  SetConsoleScreenBufferSize(wHnd, bufferSize);

  getchar();
}

Thus far we have created the initialization of a nice console window! The next step is to begin writing things onto the console with a double buffering system! This may sound fancy, but in actually it's very simple in this project. The next post in this series will be devoted to this!


Series on creating a Windows Console game:


Source(s):
http://benryves.com/
http://msdn.microsoft.com/en-us/library/windows/desktop/ms682073(v=vs.85).aspx

Tuesday, November 15, 2011

I Want to Learn Programming, but I Know Nothing!

I want this post to be a great resource for people who have absolutely zero knowledge of programming to be able to pick up and start coding in the language C. I feel I have a fair level of empathy for those just starting to learn (since I started learning not too long ago), and want to write this post out before I get too competent as a programmer and forget my empathy altogether!

So you want to learn to program. Great! So you're reading this article, and here you'll learn to start with C on a Windows Operating System. Starting with C is an excellent place to start, as it grounds you with a very solid base of understanding for programming in general, that of which I feel is easily transferable to other languages. I even feel that once you learn the basics of C and transfer to another language (I recommend Python!) you'll be better off in the long run than if you started with another language and then moved to C (perhaps start with Java and move to C). I won't get into deep details about this point as that's out of the scope of this article, but you should definitely take my word on the matter.


Be aware that I'm going to use a lot of new and scary programmer terminology in this post, like statements, declarations, and initialization. Don't be afraid, as I give a link to the definition of words when I first use them. Read the links and make sure you understand what I'm referring to.

The programming in C that I'll be teaching you, as an absolute beginner, will be of the following steps:
  • Write code
  • Compile code into an executable
An executable is a .exe file that your computer can run, and when this executable file is run your computer will actually follow the steps you wrote in your code, thus running your code as a program. Compiling your code is actually a step that a compiler does for you, in which it translates your C code into machine code. Machine code can be viewed as a lot of very hard to read 1's and 0's, also known as binary. The reason people don't code directly in machine code is because it's so hard to read. C is a nice translation of machine code for people to work with. If you want to learn more about how computers work on a very low level, I suggest reading Code: The Hidden Language of Computer Hardware and Software by Charles Petzhold.

You can write your C code in any text editor you like. You can just simply use notepad (to open hit windows key+r and type notepad, then hit enter), though I recommend using the IDE apart of Visual Studio. Once you write some C code, save your file as a .c file and then use a compiler to turn it into a .exe file.


Now what about this compiler business. You might have already googled for a C compiler by now and noticed that there is a multitude of compilers out there. Luckily I have one to recommend to you! Download and install Visual Studio 2010 Express.

When installing you'll be ask if you have a CD. Just say no and download the installation from online. Once you see this screen (mine is reinstalling however):


Be prepared to restart your computer in the middle of the installation. For some reason this installation took a long time, so be patient! After you restart, at the end of the installation it says: requires a key. Go ahead and hit the button to acquire one; you'll need a microsoft address from something like live.com. Once you fill out this lame questionnaire with fake answers copy/paste your key into the box and continue. You're now ready to code your C programs, and compile them.

Now Visual C++ is called Visual C++, but in actuality you'll only be writing C code for now as I recommend avoiding C++ until you're proficient with C. The reasons for this are simple: if you're proficient with C, you understand its limitations. Once you understand C's limitations and hardships, you can better utilize C++.

Now for the fun part, writing some code! I'm simply going to just give you some code to copy and paste into a .c file. Before this you need to create a .c file, however. Go to, in Visual C++, File >> New >>Project. Select Win32 Console Application -this means your application will run in a Windows console. Enter a name and a solution name (probably use the same thing for both), you can call it Test. Hit ok. This part is important, when you see this screen:


Be sure to hit the next button! We need to disable the precompiled header. Hitting next will take you to this screen:


You need to check mark the Empty Project box under Additional options, and uncheck the Precompiled header option. Hit finish! Now you'll see some folders on to your left:


Right click on the Source Files folder (they are actually called filters not folders) and go to Add >> New Item. Click on the C++ file button, enter a filename in the Enter_Name box. Enter in "main.c" without quotes and hit Add. The added .c file should open up! Even though you specified a C++ file, since you named it a .c file it will be for C code. Now lets get to coding! Copy/paste this little bit into your main.c file:

int main(void)
{
  return 0;
}

This code is the minimum requirement for any C program to be able to run. Basically it starts, and then ends. In order to compile this code into an exe, hit Debug >> Build Solution (or F7). You'll see some output form from the compiler in a little box at the bottom of the window It should read:


1>------ Build started: Project: Test2, Configuration: Debug Win32 ------
1>  main.cpp
1>  Test2.vcxproj -> c:\users\cecil\documents\visual studio 2010\Projects\Test2\Debug\Test2.exe
========== Build: 1 succeeded, 0 failed, 0 up-to-date, 0 skipped ==========


There you go! You've compiled your program. To run it open up the folder your solution is in. To do this you can copy paste the path to the file from your compiler output, as shown in the text above. Once you find your Test.exe (in the debug folder of your solution folder) try double clicking on it. A black box should open and then quickly close. This code starts, and then ends. I'll teach you how to make your program pause until you hit enter later, but for now lets get into the basics of C code syntax.

In C whenever you write lines of code those lines of code are going to be turned into actions that a computer will follow. Whenever you write a statement it must end with a semi-colon ;. The ; is letting the computer know that it has reached the end of a statement. This is important, otherwise the computer running your code could perhaps mix two statements together as a single statement, which would result in strange behavior.

Take a look back at your code you copy/pasted and lets check out what these different lines of code do. int main(void) is setting up the part of your code the program starts at. Every single time any program is ever started that was written in C, it starts at the line with main in it. This line is actually creating what is called the main function. I won't go into detail on exactly what a function is, as all you need to know for now is that this is the first code that is run when your program is started, and then the next line below it will be read then executed, and so on. The open curly bracket { is beginning of the main function, and the } is the end of the main function. For now you're going to write all your code within these two brackets. It's standard C syntax that code within two curly brackets is one tab farther to the right than the code outside of those two curly brackets, which is why the return 0; line is indented. The last thing to explain is this return 0; business. The return 0; line is actually the line of code that ends your program. Once your code is run and this line is executed, your program ends immediately. The 0 is actually a value returned to your operating system letting it know that the program ended successfully. If this sounds confusing, then don't worry about it - all you need to know is that when this line is reached your program ends.

A variable in C is a place in memory that stores a value. There are different types of values that can be stored, and so there are different types of variables to hold those different types of values. I'd like to talk about Integers. For a more complete list of the different types of variables available in C, check out this link on Wikipedia.

Lets start with integers. An integer in C is a whole number value ranging from −2,147,483,648 to 2,147,483,647. In order to create a variable in C of the type integer, you would write:

int myInteger;

This code declares a variable with the name myInteger, and specifies it's type as an integer with the word int. Don't forget your semi-colon to end the statement! Now what is the value of myInteger? Well currently it would have an undefined value since you have not initialized it yet. To initialize myInteger with a value, you can write:

myInteger = 10;

The above code will place the value of 10 into myInteger. Now you can type the word myInteger somewhere in your code, and it will refer to the value inside of it, which is currently 10. The equal sign is actually an operator. An operator in C takes a value and operates on it somehow. The equal sign, called the assignment operator, takes whatever is to its right and places the value of it into whatever is on its left. This means that the following code is invalid:

10 = myInteger;

The above code is invalid because it would be trying to place the value inside of the variable myInteger into 10, which is simply a constant value. Some other operators you can use to manipulate values are: - + * / %. Here is what each one does:

  • - The subtraction operator. Finds the difference between two values.
  • + The addition operator. Finds the sum of two values.
  • * The multiplication operator. Finds the product of two values.
  • / The division operator. Finds the quotient of two values..
  • % The modulo operator. Finds the remainder of two divided values.

What do you think the following code does:

int val;
val = 5;
val = val + 5;

The above code creates an integer variable called val, and then assigns the value of 5 to it in the next line. The last line then assigns the value of val + 5 to val. You can also do the following:

int val1, val2, val3;
val1 = 2;
val2 = 5;
val3 = val1 + val2;

The above code creates three variables all at once within a single line. All three variables var1, var2, and var3 are all of the type integer, as denoted by the int keyword. val1 and val2 are initialized as 2 and 5 respectively, then val3 is assigned the value of the sum of val1 and val2, which is 7. Note that val1 and val2 remain unchanged, as the assignment operator doesn't change anything to the right side of it; it only assigns the value of what is on the right, to whatever is on its left.

Now what if you want to actually see the value inside of a variable? Well then you need to modify your program slightly. Take a look at the following code:

#include <stdio.h>

int main(void)
{
  printf("This is a string!");

  return 0;
}

The above code introduces a couple new things. printf is a line of code that is apart of the C standard library (a bunch of features for you to use as a coder), and it prints a string onto the screen. For now, just know that anything within C code that is within double quotes "" is a string. So if you place text within double quotes, within a printf statement like above, it will be considered a string and printf will place it onto the screen when you run your program. The other new thing is the #include <stdio.h> line. This line of code actually is telling the compiler to include a portion of the C standard library into your .C file, specifically the portion with the name stdio.h. stdio stands for Standard In Out, which is referring to input and output, which is why we need it to output a string onto the screen.

Try compiling and running this code. Sadly, your program opened and then closed very quickly. This is because your program prints the message "This is a string!" and then abruptly reaches the return 0; line and ends. To fix this, modify your code to look like so:

#include <stdio.h>

int main(void)
{
  printf("This is a string!");
  getchar();

  return 0;
}

The line getchar(); is a function from the C standard library in stdio.h. I won't go into the details, as that's out of the scope of this post, but just know that this line waits for the user to hit enter before executing the next line of code, thus letting you read what you output to the screen.

In order to have your value show up on the screen, you need to modify your code slightly:

#include <stdio.h>

int main(void)
{
  int i;

  i = 5;
  printf("%d", i);

  getchar();
  return 0;
}


This new version of the code uses a special character within the string in the printf statement. The %d line is actually saying to place the variable i into the spot in the string where %d is located. %d basically means "insert variable of type integer into this location". You can place more characters before and after the %d, but not in between the percent sign and the d character. This will let you see the value of the integer i on the screen! You can now try more fancy things, here's an example program to calculate the product of two variables and print it to the screen:


#include <stdio.h>

int main(void)
{
  int i, j, k;

  i = 5;
  j = 10;
  k = i * j;
  printf("%d", k);

  getchar();
  return 0;
}

And there you have it! You've now learned how to write a simple program to do mathematical calculations on integers and display a single integer on the screen. Congradulations!