Previously I showed you all how to set up a console window! Now lets talk about writing to the Windows console. One can use printf, or fprintf, but those options aren't really exactly ideal; you don't have a desired amount of control. We're going to use the function WriteConsoleOutput in order to write a buffer of characters (array of characters) onto the console's screen buffer. The screen buffer is the inside of your game's window in which characters are written to and appear. In order to use the WriteConsoleOutput function, you have to pass to it a buffer of characters, which is really just an array of characters. The character buffer will be comprised of an array of CHAR_INFO structures, which is a Microsoft defined type that comes from windows.h. Lets get started with just writing a single character to the screen.
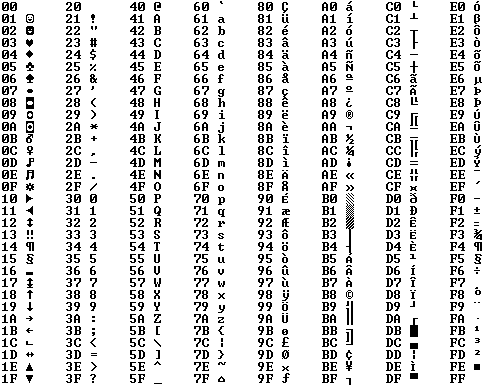
In C characters are enclosed letters or numbers enclosed in single quotes, like so: 'c'. Characters in c, like 'c', are treated very similarly to integers. The main difference is that the range of a character (unsigned) is from 0 to 255, where a range of integers reaches much much higher. Due to this a character variable will be one byte in memory (8 bits). You can actually write in your code 'c', and it will be treated as the value of whatever the ascii value of C is, which is 99 in decimal. You can even write c - 8, and it will be treated as 99 - 8. Here is my favorite chart for all the values of all the ascii characters available, note the indices are in hexidecimal:
The CHAR_INFO structure contains two data members; a character and its attributes. The character can either be a unicode or ascii character. We're going to stick with ascii characters within the Char.AsciiChar data member (remember, this is just an integer with a range of 0-255). The Attributes data member is a WORD type, which is just a Microsoft defined type. The WORD type is simply a 16-bit unsigned integer with a range of 0 through 65535. The Attributes data member can be viewed simply as a byte of data with the following value representations as colors:
- FOREGROUND_BLUE - 0x0001
- FOREGROUND_GREEN - 0x0002
- FOREGROUND_RED - 0x0004
- FOREGROUND_INTENSITY - 0x0008
- BACKGROUND_BLUE - 0x0010
- BACKGROUND_GREEN - 0x0020
- BACKGROUND_RED - 0x0040
- BACKGROUND_INTENSITY - 0x0080
These values are the different colors accessible for use within the Windows console. The values are represented in hexadecimal, and should be viewed as a byte:

In the picture above I've shown a single byte, which is 8 bits of information. Each bit can be either a 1 or a 0. The first bit is on the right (at least for this representation). If you wish for your Attributes data member to contain the value blue, then you set the first bit of this byte to 1. The second bit represents whether or not you want to add green to your color, and so on and so forth. The above image would contain the values of blue, red, and intensity. This value would be in decimal format 1 + 4 + 8, which is 13. Intensity brightens the color to be displayed. Knowing this will allow us to construct whatever color we like with some simple addition! For the first color lets mix blue, green, and intensity for a value of 11.
Here is what MSDN says for the WriteConsoleOutput function in regards to parameters required:
BOOL WINAPI WriteConsoleOutput(
  __in     HANDLE hConsoleOutput,
  __in     const CHAR_INFO *lpBuffer,
  __in     COORD dwBufferSize,
  __in     COORD dwBufferCoord,
  __inout  PSMALL_RECT lpWriteRegion
);
hConsoleOutput is simply the output handle for our window, *lpBuffer is a pointer to a buffer of CHAR_INFO structures, dwBufferSize is the size of the buffer in character elements, dwBufferCoord is the location on your console screen buffer in which to write the image, and lpWriteRegion is just a pointer to a COORD structure for dictating which portion of the console to write to. Here's some code using this knowledge to write a character to the screen:
#include <windows.h> /* for HANDLE type, and console functions */
#include <stdio.h> /* standard input/output */

HANDLE wHnd; /* write (output) handle */
HANDLE rHnd; /* read (input handle */

int main(void)
{
  /* Window size coordinates, be sure to start index at zero! */
  SMALL_RECT windowSize = {0, 0, 69, 34};

  /* A COORD struct for specificying the console's screen buffer dimensions */
  COORD bufferSize = {70, 35};

  /* Setting up different variables for passing to WriteConsoleOutput */
  COORD characterBufferSize = {1, 1};
  COORD characterPosition = {0, 0};
  SMALL_RECT consoleWriteArea = {0, 0, 0, 0};

  /* A CHAR_INFO structure containing data about a single character */
  CHAR_INFO characterQ;
  characterQ.Char.AsciiChar = 'Q'; /* Setting the Char.Ascii data member of characterQ to the value of 'Q' */

  /* Setting up the color values for our Q character: blue + green + intensity */
  characterQ.Attributes = FOREGROUND_BLUE | FOREGROUND_GREEN |
                          FOREGROUND_INTENSITY;

  /* initialize handles */
  wHnd = GetStdHandle(STD_OUTPUT_HANDLE);
  rHnd = GetStdHandle(STD_INPUT_HANDLE);

  /* Set the console's title */
  SetConsoleTitle("Our shiny new title!");

  /* Set the window size */
  SetConsoleWindowInfo(wHnd, TRUE, &windowSize);

  /* Set the screen's buffer size */
  SetConsoleScreenBufferSize(wHnd, bufferSize);

  /* Write our character buffer (a single character currently) to the console buffer */
  WriteConsoleOutputA(wHnd, &characterQ, characterBufferSize, characterPosition, &consoleWriteArea);

  getchar();
}
The code above prints the character Q to the screen in a bright cyan color. This probably seems like a lot of work to write a single character to the screen, and it sort of is. But in actuality this isn't really how you want to write every character onto the screen. The WriteConsoleOutput function is a very slow function, and so you want to call it as little as possible. You may have heard of a term called "double buffer", well we're going to use a double buffer to do all of our modifying of a buffer off-screen, and once all our modifications are finished we can write a single image to the screen all in one go. To create this buffer, simply create an array of CHAR_INFO structures and initialize all of the Char.AsciiChar and Attribute data members! Here's an example of looping through an array of CHAR_INFOs and assigning random colors to a single Char type.
#include <windows.h> /* for HANDLE type, and console functions */
#include <stdio.h> /* standard input/output */
#include <stdlib.h> /* included for rand */

#define WIDTH 70
#define HEIGHT 35

HANDLE wHnd; /* write (output) handle */
HANDLE rHnd; /* read (input handle */

int main(void)
{
  int x, y;

  srand(time(0));

  /* Window size coordinates, be sure to start index at zero! */
  SMALL_RECT windowSize = {0, 0, WIDTH - 1, HEIGHT - 1};

  /* A COORD struct for specificying the console's screen buffer dimensions */
  COORD bufferSize = {WIDTH, HEIGHT};

  /* Setting up different variables for passing to WriteConsoleOutput */
  COORD characterBufferSize = {WIDTH, HEIGHT};
  COORD characterPosition = {0, 0};
  SMALL_RECT consoleWriteArea = {0, 0, WIDTH - 1, HEIGHT - 1};

  /* A CHAR_INFO structure containing data about a single character */
  CHAR_INFO consoleBuffer[WIDTH * HEIGHT];

  /* initialize handles */
  wHnd = GetStdHandle(STD_OUTPUT_HANDLE);
  rHnd = GetStdHandle(STD_INPUT_HANDLE);

  /* Set the console's title */
  SetConsoleTitle("Our shiny new title!");

  /* Set the window size */
  SetConsoleWindowInfo(wHnd, TRUE, &windowSize);

  /* Set the screen's buffer size */
  SetConsoleScreenBufferSize(wHnd, bufferSize);

  for (y = 0; y < HEIGHT; ++y)
  {
    for (x = 0; x < WIDTH; ++x)
    {
      consoleBuffer[x + WIDTH * y].Char.AsciiChar = (unsigned char)219;
      consoleBuffer[x + WIDTH * y].Attributes = rand() % 256;
    }
  }

  /* Write our character buffer (a single character currently) to the console buffer */
  WriteConsoleOutputA(wHnd, consoleBuffer, characterBufferSize, characterPosition, &consoleWriteArea);

  getchar();
}
The above code is creating a buffer called consoleBuffer, of a single dimensional array with the number of elements equal to WIDTH times HEIGHT, both of which are now defined at the top of the file. There is a loop that loops through all of the CHAR_INFO's Char.AsciiChar data member, and Attributes data members initializing them. You can see how I'm assigning a random value using rand, and seeding the table at the beginning of the code with srand.
You might be a little confused by the x + WIDTH * y portion of the code. I've created a single dimensional array of elements WIDTH * HEIGHT, and in order to index the array during a loop as if it were a two dimensional array, you need to use a formula. The idea behind the formula is to figure out what row you want to access, by taking the number of elements in a row and multiplying it by a value. To access the first row, you multiply the WIDTH value by 0. To access the fifth row, you'd multiply WIDTH by five. This works since as the single dimensional array is written to the screen with WriteConsoleOutput, it wraps around the screen buffer once ever WIDTH elements. Then, access a specific element within that row you add in your x value.

You might be a little confused by the x + WIDTH * y portion of the code. I've created a single dimensional array of elements WIDTH * HEIGHT, and in order to index the array during a loop as if it were a two dimensional array, you need to use a formula. The idea behind the formula is to figure out what row you want to access, by taking the number of elements in a row and multiplying it by a value. To access the first row, you multiply the WIDTH value by 0. To access the fifth row, you'd multiply WIDTH by five. This works since as the single dimensional array is written to the screen with WriteConsoleOutput, it wraps around the screen buffer once ever WIDTH elements. Then, access a specific element within that row you add in your x value.

List of all posts completed thus far:
- Setting up the Window
- Writing to the Console
- Event Handling
- Custom Color Palette and Font Size
- Painter's Algorithm
- Variable Sized Object
http://benryves.com/
http://msdn.microsoft.com/en-us/library/windows/desktop/ms682073(v=vs.85).aspx


There is an error in the last box of code.
ReplyDeleteThanks, fixed it :)
ReplyDeleteIt was a remnant of copy/pasting a wrapper function I wrote.
No problem. But now I keep getting errors on the srand(time(0)) line. So after I read your post on srand I just switched it to srand(9) and it seemed to work fine. Love this blog man.
ReplyDeleteI get "time not declared" error too if I dont add #include
ReplyDelete#include .<.ctime.>.
ReplyDeleteseems like this chat doesnt like <> :b
With GCC I just needed the includes at the top of the file. If you use a different compiler you might need different includes :(
ReplyDelete