Showing posts with label Image. Show all posts

Monday, February 20, 2012

Window's Console Game: Variable Sized Object

In the previous post I had talked a little bit about image ordering, and image transparency. The way the image data was held in memory was very quirky! We had to create an entire header file for each image, and each image had to be an entirely different structure definition due to arrays of data being different from image to image. I'd like to show you a method that makes use of some clever macros in order to achieve an interesting variable-sized image structure! The idea was actually brought to me by a friend of mine named Malcolm Smith. Here's the structure design for an object to be dynamically sized during run-time, in our case for images:

typedef struct _Image
{
  int width; 
int height;
unsigned char *chars;
unsigned char *colors;
} Image_;


In the above structure we have two pointers, one to chars and one to colors. These pointers will point to arrays of unsigned characters, which is the datatype that represents both colors and characters for the Window's console. In order to access these arrays, you should recall that the name of an array can be treated the same as a pointer to the first element in the array. So after we allocate space for our arrays we'll need to initialize chars and colors properly by setting them to point to the first element in our arrays.


In order to go about allocating our space properly we need to allocate the space of the Image_ structure, space for the width * the size of our character array * height, and finally space for our color array * width * height. Here's a call to malloc to this in one single swoop:


Image_ *image = (Image_ *)malloc( sizeof( Image_ ) +
                                  sizeof( width * height * sizeof( unsigned char ) +
                                  sizeof( width * height * sizeof( unsigned char ) );

The nice thing about this sort of allocation is that it isn't broken up into separate allocation calls, which speeds up the process since allocation is slow. This also keeps all the parts of memory in the same location in memory all adjacent to one another, as opposed to who knows where in memory when malloc is called multiple times, thus lessening memory fragmentation.


Now we have our problem of getting our chars and colors pointers to point to their proper locations in memory. We aren't going to set up a conventional array of pointers, like proper C would dictate. Instead we'll use a couple macros to help us index the array ourselves, thus saving some references and memory in the process. We'll make use of a few macros to take over the job from the compiler; observe:


#define unsigned char CHAR
#define unsigned char COL

#define PtrAdd( ptr, offset ) \
  (((char *)ptr) + offset)

#define CharAt( image, x, y ) \
  (CHAR *)(PtrAdd( image->chars, ((y) * image->width + (x)) * sizeof( CHAR ) ))

#define ColorAt( image, x, y ) \
  (COL *)(PtrAdd( image->colors, ((y) * image->width + (x)) * sizeof( COL ) ))


The first macro is a nice macro to have as it is generalized. It simply takes a pointer and an offset in bytes, then returns a pointer in memory that is ahead (or behind) the original pointer by the offset bytes. It's a macro for pointer addition/subtraction that works by typecasting the pointer supplied as a char, which is a byte in size, thus forcing the addition of the offset to work in chunks of 8 bits. As such the units of offset is in bytes. This can be used to initialize our chars and colors pointer!


// Initialize chars pointer to directly after Image_ struct
image->chars = PtrAdd( image, sizeof( Image_ ) );

// Initialize colors pointer to directly after chars array
image->colors = PtrAdd( image->chars, width * height * sizeof( CHAR );

Now that we can properly initialize our pointers in our struct, it's time to start making use of our CharAt and ColorAt macros to index our two arrays! First though lets initialize our arrays to zero with a looping function.


void ZeroImage( Image_ *image )
{
  int x, y; // used for indexing

  CHAR *thisChar;
  COL *thisColor;

  for(y = 0; y < image->height; y++)
  {
    for(x = 0; x < image->width; x++)
    {
      thisChar = CharAt( image, x, y );
      *thisChar = 0;
    }
  }

  for(y = 0; y < image->height; y++)
  {
    for(x = 0; x < image->width; x++)
    {
      thisColor = ColorAt( image, x, y );
      *thisColor = 0;
    }
  }
}

A function that loops through all elements of the chars and colors array is very easy to write with our macros. You might be able to guess how we're going to fill out our arrays. You can actually copy/paste the ZeroImage function and change the lines that assign a zero to lines that assign a character value. You can use the x and y iterators to index an array of image data as well! Here's an example function:


void ImageSet( Image_ *image, CHAR *charData, COL *colorData )
{
  int x, y; // used for indexing
  CHAR *thisChar;
  COL *thisColor;

  for(y = 0; y < image->height; y++)
  {
    for(x = 0; x < image->width; x++)
    {
      thisChar = CharAt( image, x, y );
      *thisChar = charData[(y * image->width) + x];
    }
  }

  for(y = 0; y < image->height; y++)
  {
    for(x = 0; x < image->width; x++)
    {
      thisColor = ColorAt( image, x, y );
      *thisColor = colorData[(y * image->width) + x];
    }
  }
}

Now all you'd need in order to implement this variable-sized image format is image data! You can write image data by hand, use some interesting tools, or parse the data from an image (like a BMP) yourself. Later on in another future post I may perhaps write about how to parse a BMP for it's image data. For now however, I suggest getting comfortable with the tools I've linked to.


Series on creating a Windows Console game:

Monday, December 5, 2011

Windows Console Game: Painter's Algorithm


The previous post in this series was on a wonderful bag of tricks used to set a custom color palette (awesome!) and change the font and font size. In this post we'll be going over the painter's algorithm, and how to actually make use of it in your game.


The painter's algorithm is a very simple priority paradigm which dictates when you place what image onto the screen.


For example suppose you have three different images; the sky, a cloud, and  the sun. You want to display these images, but you don't want the sun overlapping a cloud (physically impossible), or even worse have the blue sky overlap everything. To solve this you simply draw images onto the screen starting with the one that is going to be furthest back in terms of depth, which would be the sky.


Example of drawing sky, then sun, then cloud. Correct.


Example of drawing sky, then cloud, then sun. Wrong.


If we recall the article on event handling, the article actually taught a method for producing and writing images to the screen by using header files to hold image data and a function to write images to an array (or buffer) of CHAR_INFO structures. Using the same system, you can create images in header files and then write them to the screen in the correct order so that images overlap each other at the proper times. The way you go about this is to have your array of CHAR_INFO structures for writing images to. Then once you've manipulated the array (or buffer) all you want, you then pass it to the WriteConsoleOutput function and place it onto the screen in one fell swoop.


Here's a screenshot of a demo program I wrote just for this specific purpose!
Rendering of images with transparency using painter's algorithm.
Note: Read this article for info on resizing font, this will allow
you to have square characters like in the image above (8x8).


Building from our knowledge gained in the previous posts, I've put together a nice demo that displays the images above, and lets you draw on the screen with the left and right clicks of the mouse. Lets examine some of the code:


#ifndef FILESUNH
#define FILESUNH


/* A SUN background! */


#define SUNW 15
#define SUNH 15


typedef struct
{
  int width;
  int height;
  int chars[SUNW * SUNH];
  int colors[SUNW * SUNH];
} _SUN;


_SUN SUN = 
{
  SUNW,
  SUNH,
  {
    255,255,255,255,255,255,255,177,255,255,255,255,255,255,255,
    255,255,255,255,255,255,255,255,255,255,255,255,255,255,255,
    255,255,255,177,255,255,255,177,255,255,255,177,255,255,255,
    255,255,255,255,177,255,255,255,255,255,177,255,255,255,255,
    255,255,255,255,255,255,177,177,177,255,255,255,255,255,255,
    255,255,255,255,255,177,178,219,178,177,255,255,255,255,255,
    255,255,255,255,177,178,219,219,219,178,177,255,255,255,255,
    177,255,177,255,177,219, 94,219, 94,219,177,255,177,255,177,
    255,255,255,255,177,178,219,126,219,178,177,255,255,255,255,
    255,255,255,255,255,177,178,219,178,177,255,255,255,255,255,
    255,255,255,255,255,255,177,177,177,255,255,255,255,255,255,
    255,255,255,255,177,255,255,255,255,255,177,255,255,255,255,
    255,255,255,177,255,255,255,177,255,255,255,177,255,255,255,
    255,255,255,255,255,255,255,255,255,255,255,255,255,255,255,
    255,255,255,255,255,255,255,177,255,255,255,255,255,255,255,
  },
  {
      0,  0,  0,  0,  0,  0,  0, 62,  0,  0,  0,  0,  0,  0,  0,
      0,  0,  0,  0,  0,  0,  0,  0,  0,  0,  0,  0,  0,  0,  0,
      0,  0,  0, 62,  0,  0,  0, 62,  0,  0,  0, 62,  0,  0,  0,
      0,  0,  0,  0, 62,  0,  0,  0,  0,  0, 62,  0,  0,  0,  0,
      0,  0,  0,  0,  0,  0, 62, 62, 62,  0,  0,  0,  0,  0,  0,
      0,  0,  0,  0,  0, 62, 62, 14, 62, 62,  0,  0,  0,  0,  0,
      0,  0,  0,  0, 62, 62, 14, 14, 14, 62, 62,  0,  0,  0,  0,
     62,  0, 62,  0, 62, 14,224, 14,224, 14, 62,  0, 62,  0, 62,
      0,  0,  0,  0, 62, 62, 14,224, 14, 62, 62,  0,  0,  0,  0,
      0,  0,  0,  0,  0, 62, 62, 14, 62, 62,  0,  0,  0,  0,  0,
      0,  0,  0,  0,  0,  0, 62, 62, 62,  0,  0,  0,  0,  0,  0,
      0,  0,  0,  0, 62,  0,  0,  0,  0,  0, 62,  0,  0,  0,  0,
      0,  0,  0, 62,  0,  0,  0, 62,  0,  0,  0, 62,  0,  0,  0,
      0,  0,  0,  0,  0,  0,  0,  0,  0,  0,  0,  0,  0,  0,  0,
      0,  0,  0,  0,  0,  0,  0, 62,  0,  0,  0,  0,  0,  0,  0,
  }
};


#endif /* FILESUNH */

The above code is the header file for the image of the sun. As shown in this article, you can easily create new images! The most interesting thing about this image is the 255 character code in the chars array. This code is actually used for transparency. I modified our old writeImageToBuffer code to account for transparency by adding in a single if statement. If the loop finds a character of 255, it does nothing and skips the character. This will leave whatever character was already written in that particular location alone, thus creating transparency! Take a look at the new writeImageToBuffer function:


/* Writes an image to the buffer */
void writeImageToBuffer(CHAR_INFO buffer[], int chars[], int colors[], int imageBUFFERWIDTH, int imageBUFFERHEIGHT, int xoffset, int yoffset)
{
  int x, y;
  
  /* Keep xoffset and yoffset within the screen's boundaries */
  boundCheck(&xoffset, &yoffset);
  
  for (y = 0; y < imageBUFFERHEIGHT; ++y)
  {
    for (x = 0; x < imageBUFFERWIDTH; ++x)
    {
      if (chars[x + imageBUFFERWIDTH * y] != (unsigned char)255)
      {
        buffer[(x + xoffset) + BUFFERWIDTH * (y + yoffset)].Char.AsciiChar =
               chars[x + imageBUFFERWIDTH * y];
        buffer[(x + xoffset) + BUFFERWIDTH * (y + yoffset)].Attributes =
               colors[x + imageBUFFERWIDTH * y];
      }
    }
  }
  return;
}

As I said, there's simply a new if statement to make sure that the character 255 is not written onto the screen. 255 in ASCII is a character you'll more than likely find pretty useless, as it just fills the whole space with foreground, though you have the exact same thing with 219 without any nasty side affects that 255 can ensue on your code. Basically 255 is the perfect ASCII index for transparency as it's pretty much useless as anything else.


The last thing to show in this demo is the order in which you actually write images onto the buffer, being sky sun and cloud. This is really simple as shown here:


writeImageToBuffer(consoleBuffer, SKY.chars, SKY.colors, SKY.width, SKY.height, 0, 0);
writeImageToBuffer(consoleBuffer, SUN.chars, SUN.colors, SUN.width, SUN.height, 10, 5);
writeImageToBuffer(consoleBuffer, CLOUD.chars, CLOUD.colors, CLOUD.width, CLOUD.height, 15, 11);

And there you have it! By ensuring that you write images in the correct order in terms of depth, you overwrite images farther back with images closer up creating a proper sense of depth to the viewer.


The next post in this series is on a more flexible image structure format to allow a variable sized structure.


Series on creating a Windows Console game:


Saturday, November 26, 2011

Windows Console Game: Event Handling

The last post in this series was on writing to the console; this post I'd like to go over handling events within the Windows Console. There are two types of events we're interested in: Keyboard Events and Mouse Events. The rest of the type of events we're going to ignore (and MSDN actually advises this on a couple internally used event types). In order to read keyboard events and mouse events, we need to get a record of all events that have occurred to the console since the last time these events were retrieved. This can be done with the following console functions: GetNumberOfConsoleInputEventsReadConsoleInput.


In order to read the console's input buffer (the record of events that have happened from input, including user input), we have to know how many events there are in order to dynamically allocate memory to store those events. This is where GetNumberOfConsoleInputEvents comes. It takes the read handle and a DWORD pointer as its parameters, and places the number of events there are in the address pointed by the DWORD pointer.


/* Read console input buffer and return malloc'd INPUT_RECORD array */
DWORD getInput(INPUT_RECORD **eventBuffer)
{
  /* Variable for holding the number of current events, and a point to it */
  DWORD numEvents = 0;


  /* Variable for holding how many events were read */
  DWORD numEventsRead = 0;


  /* Put the number of console input events into numEvents */
  GetNumberOfConsoleInputEvents(rHnd, &numEvents);


  if (numEvents) /* if there's an event */
  {
    /* Allocate the correct amount of memory to store the events */
    *eventBuffer = malloc(sizeof(INPUT_RECORD) * numEvents);
    
    /* Place the stored events into the eventBuffer pointer */
    ReadConsoleInput(rHnd, *eventBuffer, numEvents, &numEventsRead);
  }


  /* Return the amount of events successfully read */
  return numEventsRead;
}


The above code is a function that places an array of INPUT_RECORD structures into the content of the pointer pointed by the parameter eventBuffer. If you're confused about the double asterisk **, then read the rest of the paragraph. If you already understand what this function is doing, skip to the next paragraph. The asterisk, known as the dereference operator, can be read as "the content pointed by". In order for this getInput function to place the INPUT_RECORD structs into the address pointed by a pointer, we have to pass a pointer to a pointer to the function -otherwise we'd only pass the value of a pointer to the function, which isn't what we want. Then, to access the the pointer we passed, we'd use one asterisk. To access the value pointed by the pointer that is pointed to by the parameter pointer, we must use a second *. See the below diagram for a visual representation. On the left, Pointer 1 is dereferenced giving you direct access to Pointer2. Pointer2 is dereferenced giving you direct access to the INPUT_RECORD. The right side of the diagram uses two dereferences to directly access INPUT_RECORD in a single stroke.


Now that we have a function for getting the INPUT_RECORD structs, we need to be able to loop through each structure and analyze what kind of record it is, and depending on what it does we can do whatever action we like.


while(1)
  {
    /* Get the input and number of events successfully obtained */
    numEventsRead = getInput(&eventBuffer);
    
    /* if more than 0 are read */
    if (numEventsRead)
    {
      /* loop through the amount of records */
      for (i = 0; i < numEventsRead; i++)
      {
        /* check each event */
        switch (eventBuffer[i].EventType)
        {
          /* if type of event is a KEY_EVENT */
          case KEY_EVENT:
            switch (eventBuffer[i].Event.KeyEvent.wVirtualKeyCode)
            {
              /* if escape key is pressed*/
              case VK_ESCAPE:
                return 0;
            }
        }
      }
    }
  }

The above code continuously loops until a user presses the escape key on their keyboard, which then makes the program close. This works by getting the INPUT_RECORD structs into the pointer eventBuffer (which points to type INPUT_RECORD) using our getInput function, and placing the return value thereof into numEventsRead. The loop then checks for a KEY_EVENT, and if found checks to see if the escape key was pressed. Similarly, you can check to see if a MOUSE_EVENT occurred in this very same way. If you understood what I've explained thus far in all of this series, you should be able to check for any keypress, with the help of the virtual keycode page, and then do something thereafter.


Now how about writing something onto the console when you click your left mouse button? The first thing you'd need is to be able to check for a MOUSE_EVENT record, and get the mouse's x and y coordinates from the MOUSE_EVENT structure. Here's an example of a case to do such a thing:


case MOUSE_EVENT:
  offsetx = eventBuffer[i].Event.MouseEvent.dwMousePosition.X;
  offsety = eventBuffer[i].Event.MouseEvent.dwMousePosition.Y;
  if (eventBuffer[i].Event.MouseEvent.dwButtonState == FROM_LEFT_1ST_BUTTON_PRESSED)
  {
    writeImageToBuffer(consoleBuffer, REDRECTANGLE.chars, REDRECTANGLE.colors, REDRECTANGLE.width, REDRECTANGLE.height, offsetx - 1, offsety - 1);
    write = YES;
  }

This indexes the INPUT_RECORD structs when a MOUSE_EVENT structure is found, and then accesses the data members X and Y, as detailed here, and places the values of the x and y position into two integers. The large constant FROM_LEFT_1ST_BUTTON_PRESSED is a Microsoft definition for a left-click. Now what is this writeImageToBuffer function? That doesn't seem to be a MSDN documented function... Well it's not! It's a simple function I wrote to write any image onto the screen buffer, given the correct parameters. The image it is writing is called REDRECTANGLE, which is actually a structure defined in a file I've written called redRectangle.h. The red rectangle is a square of 9 red characters, so to write this square onto where the user clicks, you must use offsetx - 1, and offsety -1, otherwise the top left of the red rectangle image will be placed on the left-click location, instead of the center.


Now lets check out redRectangle.h so you can see how I've set up the image of REDRECTANGLE!


/* redRectangle.h */


#ifndef FILEREDRECTANGLEH
#define FILEREDRECTANGLEH


/* A red rectangle! */


#define REDRECTANGLEW 3
#define REDRECTANGLEH 3


typedef struct
{
  int width;
  int height;
  int chars[REDRECTANGLEW * REDRECTANGLEH];
  int colors[REDRECTANGLEW * REDRECTANGLEH];
} _REDRECTANGLE;


_REDRECTANGLE REDRECTANGLE = 
{
  REDRECTANGLEW,
  REDRECTANGLEH,
  {
    219, 219, 219,
    219, 219, 219,
    219, 219, 219,
  },
  {
    4  , 4  , 4  ,
    4  , 4  , 4  ,
    4  , 4  , 4  ,
  }
};


#endif /* FILEREDRECTANGLEH */

This was the cleanest way I could think of for setting up an image that should be compatible with all versions of C. I'll start explaining from the top of the file. The two preprocessor directives ifndef and define are used to see if FILEREDRECTANGLEH is defined yet or not. If it is not yet defined, then the entire contents of the file will be included wherever an include of this file is placed. If the define FILEREDRECTANGLEH is already defined, it means that you've already included this file somewhere, and so the entire contents of the file will be skipped!


Screenshot of the final demonstration program, drawing on the window!


I have two defines for each image I write in this format, and they represent width and height as 3 in this image. These defines are critical for declaring a REDRECTANGLE, as the size needs to be defined at compile, since a template for the structure needs to be created for the program to run, and as such you need to know the size of the arrays within the REDRECTANGLE structure in order to properly place it in memory! However, the use of defines in this way makes it very simple to create other copies of images. For example, to create a new image called BLUETRIANGLE, you simply use find and replace (ctrl + h for a lot of programs) and replace all instances of REDRECTANGLE, with BLUERECTANGLE. You then would modify the color and character arrays to contain the correct data, and change the WIDTH/HEIGHT values for the defines accordingly. The structure called _REDRECTANGLE is typedef'd allowing declaration of variables by skipping writing the annoying legacy struct keyword. An instance of _REDRECTANGLE called REDRECTANGLE is then declared and initialized with the arrays containing the values for the ASCII characters, and color values.


Using this format in conjunction with the writeImageToBuffer function, you can pretty easily create new images and write them with limited amounts of code! Now lets check out a finished product: link (I didn't want to post the entire unwieldy thing here).


The last thing to mention is that if you update the screen with WriteConsoleOutputA every loop, you'll probably see little flickers as the screen is updated. This is simply a limitation of the function WriteConsoleOutputA. There are a few solutions to this. The easiest solution I've come up with is to just update screen less often, and I chose to do this by limiting the time in which the screen is updated to only when the consoleBuffer is changed. Another solution is to keep track of which portions of the screen you actually need to update, and call WriteConsoleOutputA and only write with the smallest portion of the screen as possible. Also supposedly if you update the screen with the same characters and colors multiple times it increases the chance of flickering lines, so this means you should try to avoid doing so. Lastly, you can multi-thread your program, and place just the call to WriteConsoleOutput within the additional thread. I do the first solution with a simple if statement:


  /* If write is 1, meaning the screen needs to be updated */
  if (write)
  {
    /* Write our character buffer (a single character currently) to the console buffer */
    WriteConsoleOutputA(wHnd, consoleBuffer, characterBufferSize, characterPosition, &consoleWriteArea);
    write = NO;
  }

This will only call the WriteConsoleOutputA function when write is not 0.


The entire final program demonstrates drawing a square image on the screen on left-click, and a red dot to the screen on right click. There is boundary checking on the click coordinates to prevent indexing outside of the screen!


You might by now have realized that the characters you're writing to the screen are oddly shaped rectangles. What about nice square characters? Square characters are essential for creating a nice game :( Well the next post in this series covers setting the console's font, font size, and even the color palette!


Series on creating a Windows Console game:

Wednesday, November 16, 2011

Windows Console Game: Writing to the Console

Previously I showed you all how to set up a console window! Now lets talk about writing to the Windows console. One can use printf, or fprintf, but those options aren't really exactly ideal; you don't have a desired amount of control. We're going to use the function WriteConsoleOutput in order to write a buffer of characters (array of characters) onto the console's screen buffer. The screen buffer is the inside of your game's window in which characters are written to and appear. In order to use the WriteConsoleOutput function, you have to pass to it a buffer of characters, which is really just an array of characters. The character buffer will be comprised of an array of CHAR_INFO structures, which is a Microsoft defined type that comes from windows.h. Lets get started with just writing a single character to the screen.

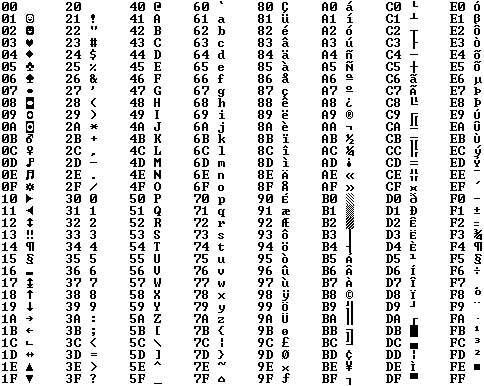
In C characters are enclosed letters or numbers enclosed in single quotes, like so: 'c'. Characters in c, like 'c', are treated very similarly to integers. The main difference is that the range of a character (unsigned) is from 0 to 255, where a range of integers reaches much much higher. Due to this a character variable will be one byte in memory (8 bits). You can actually write in your code 'c', and it will be treated as the value of whatever the ascii value of C is, which is 99 in decimal. You can even write c - 8, and it will be treated as 99 - 8. Here is my favorite chart for all the values of all the ascii characters available, note the indices are in hexidecimal:


The CHAR_INFO structure contains two data members; a character and its attributes. The character can either be a unicode or ascii character. We're going to stick with ascii characters within the Char.AsciiChar data member (remember, this is just an integer with a range of 0-255). The Attributes data member is a WORD type, which is just a Microsoft defined type. The WORD type is simply a 16-bit unsigned integer with a range of 0 through 65535. The Attributes data member can be viewed simply as a byte of data with the following value representations as colors:
  • FOREGROUND_BLUE - 0x0001
  • FOREGROUND_GREEN - 0x0002
  • FOREGROUND_RED - 0x0004
  • FOREGROUND_INTENSITY - 0x0008
  • BACKGROUND_BLUE - 0x0010
  • BACKGROUND_GREEN - 0x0020
  • BACKGROUND_RED - 0x0040
  • BACKGROUND_INTENSITY - 0x0080
These values are the different colors accessible for use within the Windows console. The values are represented in hexadecimal, and should be viewed as a byte:


 In the picture above I've shown a single byte, which is 8 bits of information. Each bit can be either a 1 or a 0. The first bit is on the right (at least for this representation). If you wish for your Attributes data member to contain the value blue, then you set the first bit of this byte to 1. The second bit represents whether or not you want to add green to your color, and so on and so forth. The above image would contain the values of blue, red, and intensity. This value would be in decimal format 1 + 4 + 8, which is 13. Intensity brightens the color to be displayed. Knowing this will allow us to construct whatever color we like with some simple addition! For the first color lets mix blue, green, and intensity for a value of 11.

Here is what MSDN says for the WriteConsoleOutput function in regards to parameters required:

BOOL WINAPI WriteConsoleOutput(
  __in     HANDLE hConsoleOutput,
  __in     const CHAR_INFO *lpBuffer,
  __in     COORD dwBufferSize,
  __in     COORD dwBufferCoord,
  __inout  PSMALL_RECT lpWriteRegion
);

hConsoleOutput is simply the output handle for our window, *lpBuffer is a pointer to a buffer of CHAR_INFO structures, dwBufferSize is the size of the buffer in character elements, dwBufferCoord is the location on your console screen buffer in which to write the image, and lpWriteRegion is just a pointer to a COORD structure for dictating which portion of the console to write to. Here's some code using this knowledge to write a character to the screen:

#include <windows.h> /* for HANDLE type, and console functions */
#include <stdio.h> /* standard input/output */

HANDLE wHnd; /* write (output) handle */
HANDLE rHnd; /* read (input handle */

int main(void)
{
  /* Window size coordinates, be sure to start index at zero! */
  SMALL_RECT windowSize = {0, 0, 69, 34};

  /* A COORD struct for specificying the console's screen buffer dimensions */
  COORD bufferSize = {70, 35};
  
  /* Setting up different variables for passing to WriteConsoleOutput */
  COORD characterBufferSize = {1, 1};
  COORD characterPosition = {0, 0};
  SMALL_RECT consoleWriteArea = {0, 0, 0, 0}; 
  
  /* A CHAR_INFO structure containing data about a single character */
  CHAR_INFO characterQ;
  characterQ.Char.AsciiChar = 'Q'; /* Setting the Char.Ascii data member of characterQ to the value of 'Q' */
  
  /* Setting up the color values for our Q character: blue + green + intensity */
  characterQ.Attributes = FOREGROUND_BLUE | FOREGROUND_GREEN |
                          FOREGROUND_INTENSITY;
 
  /* initialize handles */
  wHnd = GetStdHandle(STD_OUTPUT_HANDLE);
  rHnd = GetStdHandle(STD_INPUT_HANDLE);
 
  /* Set the console's title */
  SetConsoleTitle("Our shiny new title!");
 
  /* Set the window size */
  SetConsoleWindowInfo(wHnd, TRUE, &windowSize);

  /* Set the screen's buffer size */
  SetConsoleScreenBufferSize(wHnd, bufferSize);
  
  /* Write our character buffer (a single character currently) to the console buffer */
  WriteConsoleOutputA(wHnd, &characterQ, characterBufferSize, characterPosition, &consoleWriteArea);
 
  getchar();
}
The code above prints the character Q to the screen in a bright cyan color. This probably seems like a lot of work to write a single character to the screen, and it sort of is. But in actuality this isn't really how you want to write every character onto the screen. The WriteConsoleOutput function is a very slow function, and so you want to call it as little as possible. You may have heard of a term called "double buffer", well we're going to use a double buffer to do all of our modifying of a buffer off-screen, and once all our modifications are finished we can write a single image to the screen all in one go. To create this buffer, simply create an array of CHAR_INFO structures and initialize all of the Char.AsciiChar and Attribute data members! Here's an example of looping through an array of CHAR_INFOs and assigning random colors to a single Char type.
#include <windows.h> /* for HANDLE type, and console functions */
#include <stdio.h> /* standard input/output */
#include <stdlib.h> /* included for rand */

#define WIDTH 70
#define HEIGHT 35

HANDLE wHnd; /* write (output) handle */
HANDLE rHnd; /* read (input handle */

int main(void)
{
  int x, y;
  
  srand(time(0));
  
  /* Window size coordinates, be sure to start index at zero! */
  SMALL_RECT windowSize = {0, 0, WIDTH - 1, HEIGHT - 1};

  /* A COORD struct for specificying the console's screen buffer dimensions */
  COORD bufferSize = {WIDTH, HEIGHT};
  
  /* Setting up different variables for passing to WriteConsoleOutput */
  COORD characterBufferSize = {WIDTH, HEIGHT};
  COORD characterPosition = {0, 0};
  SMALL_RECT consoleWriteArea = {0, 0, WIDTH - 1, HEIGHT - 1};
  
  /* A CHAR_INFO structure containing data about a single character */
  CHAR_INFO consoleBuffer[WIDTH * HEIGHT];
 
  /* initialize handles */
  wHnd = GetStdHandle(STD_OUTPUT_HANDLE);
  rHnd = GetStdHandle(STD_INPUT_HANDLE);
 
  /* Set the console's title */
  SetConsoleTitle("Our shiny new title!");
 
  /* Set the window size */
  SetConsoleWindowInfo(wHnd, TRUE, &windowSize);

  /* Set the screen's buffer size */
  SetConsoleScreenBufferSize(wHnd, bufferSize);
  
  for (y = 0; y < HEIGHT; ++y)
  {
    for (x = 0; x < WIDTH; ++x)
    {
      consoleBuffer[x + WIDTH * y].Char.AsciiChar = (unsigned char)219;
      consoleBuffer[x + WIDTH * y].Attributes = rand() % 256;
    }
  }
  
  /* Write our character buffer (a single character currently) to the console buffer */
  WriteConsoleOutputA(wHnd, consoleBuffer, characterBufferSize, characterPosition, &consoleWriteArea);
 
  getchar();
}
The above code is creating a buffer called consoleBuffer, of a single dimensional array with the number of elements equal to WIDTH times HEIGHT, both of which are now defined at the top of the file. There is a loop that loops through all of the CHAR_INFO's Char.AsciiChar data member, and Attributes data members initializing them. You can see how I'm assigning a random value using rand, and seeding the table at the beginning of the code with srand.

You might be a little confused by the x + WIDTH * y portion of the code. I've created a single dimensional array of elements WIDTH * HEIGHT, and in order to index the array during a loop as if it were a two dimensional array, you need to use a formula. The idea behind the formula is to figure out what row you want to access, by taking the number of elements in a row and multiplying it by a value. To access the first row, you multiply the WIDTH value by 0. To access the fifth row, you'd multiply WIDTH by five. This works since as the single dimensional array is written to the screen with WriteConsoleOutput, it wraps around the screen buffer once ever WIDTH elements. Then, access a specific element within that row you add in your x value.


And there you have it! A method for writing an image onto the screen of any given size on any location of the console's screen buffer! The next post in this series will be on Event Handling.


List of all posts completed thus far:
Source(s):
http://benryves.com/
http://msdn.microsoft.com/en-us/library/windows/desktop/ms682073(v=vs.85).aspx